
Install and configure the Shopify plugin
Install the OnlinePay Shopify plugin and configure it with your OnlinePay settings.
Overview
This section provides instructions on how to install and configure the OnlinePay Shopify plugin in your Shopify store. Ensure that you have already set up your OnlinePay account and have a Payment Provider Contract enabled for the payment methods you want to accept before you start the installation process.
Install the plugin
Before you attempt to install the Shopify plugin, ensure you have completed the prerequisites listed in the previous section.
- Log in to your Shopify store.
- Go to the Verifone Checkout AU page in the Shopify App Store.
- Click Install to install the Verifone Checkout AU plugin in your Shopify store. View the information that the app can access and click Install.
- Close the Auto Setup Tool window to return to your Shopify store. You will need to complete configuration manually.
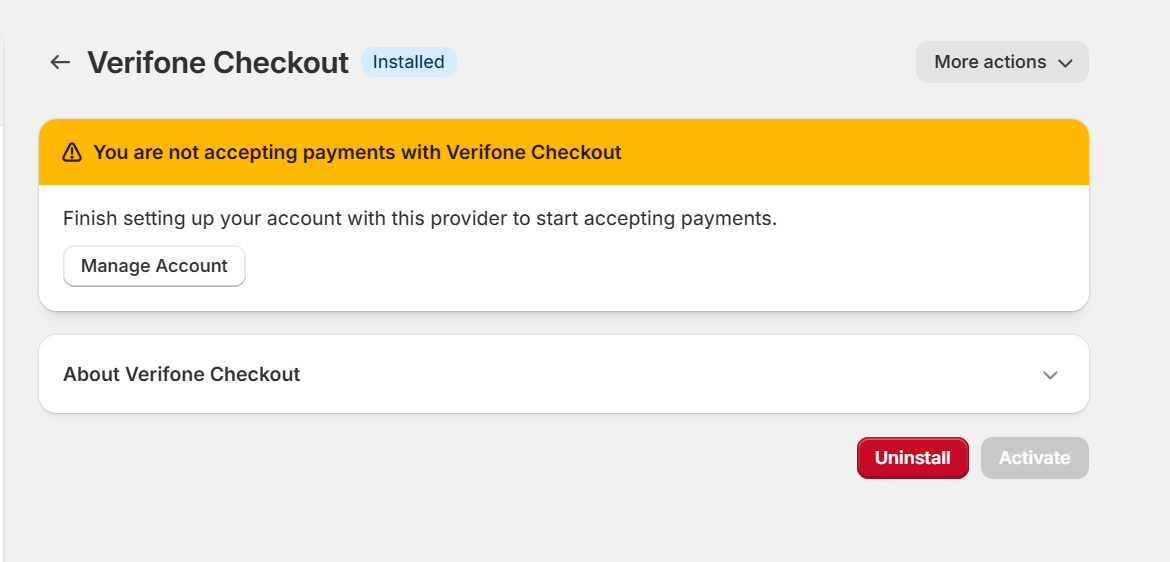
The Verifone Checkout AU plugin is now installed, but you cannot take payments until you configure it with your OnlinePay settings.
Configure the plugin manually
The Verifone Checkout AU plugin must be installed and configured with your OnlinePay settings manually before you can start accepting payments in your Shopify store.
-
On the Verifone Checkout plugin page, click Manage Account to open the setup tool.
-
Close the Auto Setup Tool window to return to set up the plugin manually.
-
In the Account settings section, enter the following credentials from the OnlinePay dashboard:
-
User ID- The unique identifier of the OnlinePay user that created the API key. This can be found on the URL for the My Account page following/users/. -
API Key- The API key you created in the OnlinePay dashboard under Profile > API Keys. -
Organisation ID- The unique identifier for the organisation you want associated with your Shopify store, found under Administration > Account Setup > Organisation Company and Sites. This should be the organisation connected to your Payment Provider Contract.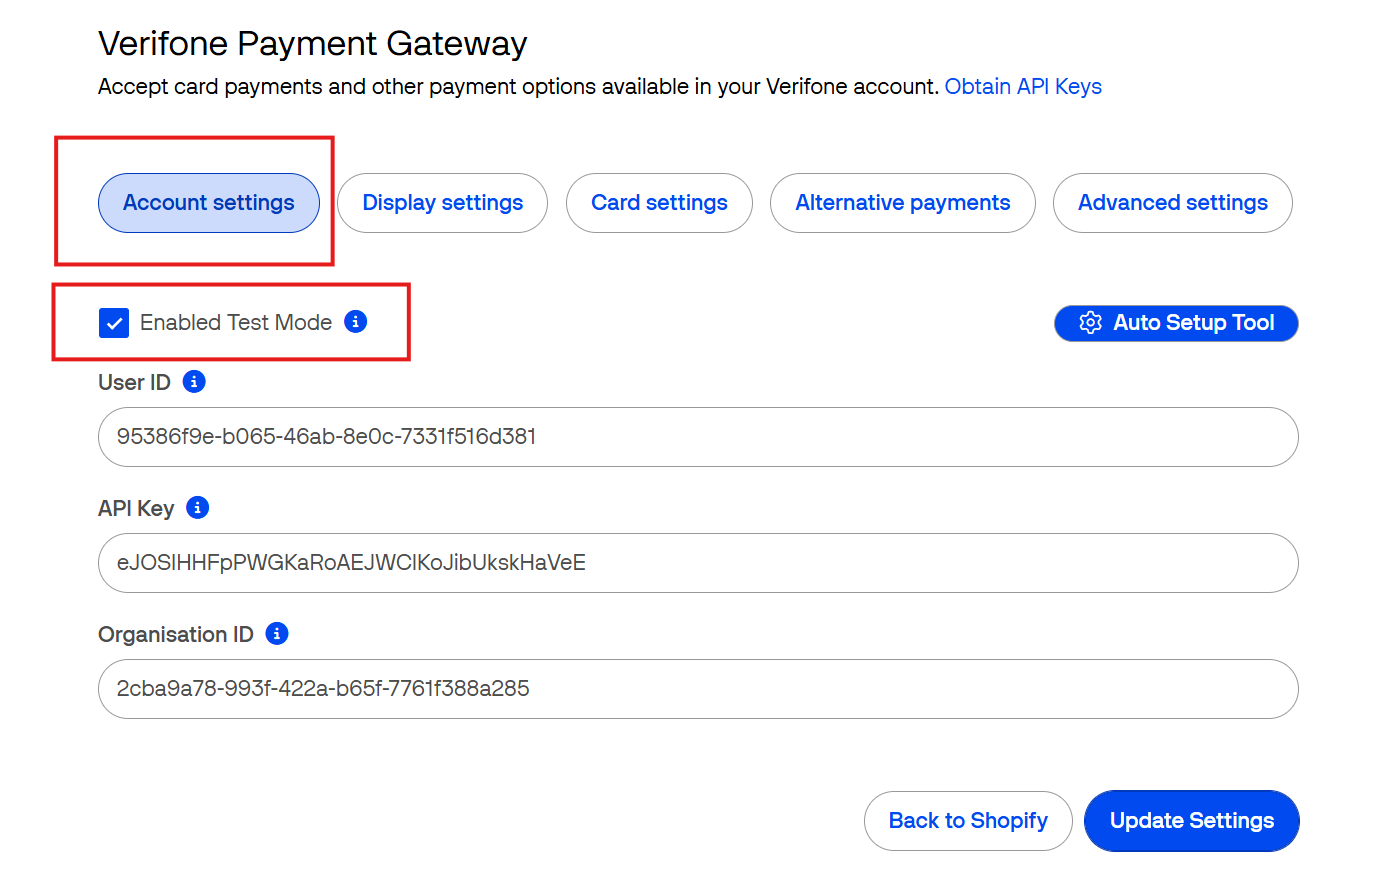
If you have an OnlinePay test account, you can select
Enable Test Modeto test the plugin in your OnlinePay CST environment. You must provide your test accountUser ID,API Key, andOrganisation IDto set up the plugin for your test account.To change the integration environment to your production account, you will need to return to this page using the Manage Account button on the Shopify plugin admin page, disable test mode, and provide your production account credentials.
See Get started with the OnlinePay API for more information on how to retrieve these values from the OnlinePay dashboard.
-
-
(Optional) The Display settings fields allow you to configure the look and feel of your payments page.
- To use a Checkout theme you have already created in the OnlinePay dashboard, provide your Checkout theme ID. If you do not provide a
Theme ID, the default OnlinePay theme will be used instead. You can also drag and drop the payment methods you want to accept into the order you want them to appear on the payment page. The payment methods appear as disabled or enabled
  on the payment page based on the payment methods you have enabled in your Payment Provider Contract.
- To use a Checkout theme you have already created in the OnlinePay dashboard, provide your Checkout theme ID. If you do not provide a
-
In Card settings, select the
Enable card paymentcheckbox to allow customers to pay with a credit or debit card, and provide your Payment Provider Contract ID. You must also enableCard 3DSand provide your 3DS Contract ID. 3D Secure is a security protocol that provides an additional layer of security for online credit and debit card transactions. We require merchants to use 3D Secure for card payments. Failing to enable 3D Secure will result in you being liable for any chargebacks. See 3D Secure for more information. -
The Advanced settings are automatically configured with
Sale. The means that authorisation and capture occurs immediately when the customer places an order.The other options are
AuthandPre-auth.Auth- Authorisation only. This is not supported for OnlinePay.Pre-auth- Authorisation and capture. Capture must be performed manually in the OnlinePay dashboard.
-
Click Update Settings to save your configuration.
-
Click Return to Shopify to return to your Shopify dashboard. The Verifone Checkout AU plugin is now installed with your OnlinePay settings.
-
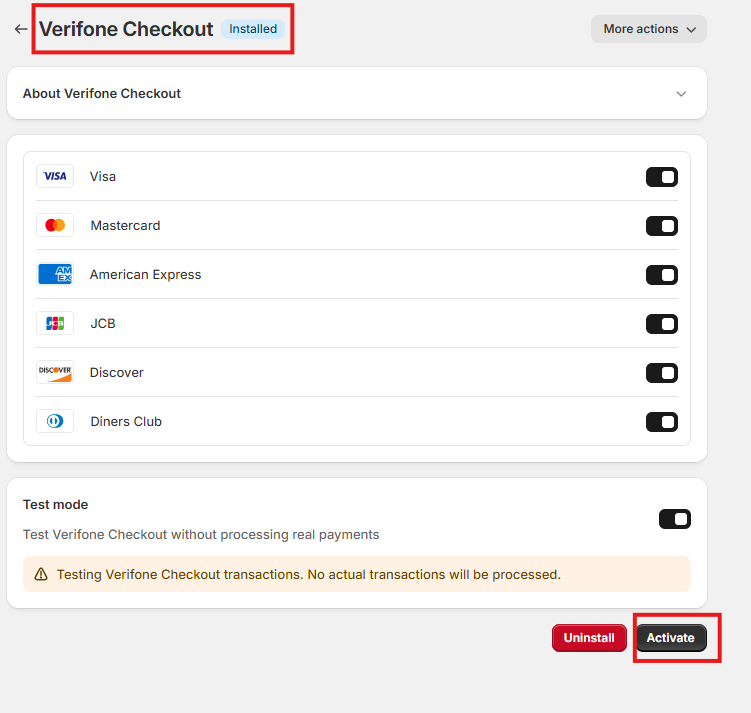
Click Activate to enable the plugin in your Shopify store. You can now start accepting payments from customers using the payment methods you have enabled in your OnlinePay Payment Provider Contract.
OnlinePay does not currently support the Alternative payments options in the Shopify plugin.
Updated 6 months ago