
Getting started with your test account
Overview
Welcome to the OnlinePay test account dashboard. This guide will help you get started with your OnlinePay test environment and learn how to use our API.
Logging in for the first time
When your merchant facility is approved, you will receive an email with instructions on how to access the dashboard and set your password. You must set your password within 72 hours of receiving your welcome email. You will then be able to log in to the OnlinePay dashboard.
You can access your OnlinePay test account dashboard at https://test.verifone.cloud/.
The dashboard logs users out after 30 minutes of inactivity.
System requirements
The OnlinePay dashboard is best suited for browser use with resolution 1280 x 1024 or higher. It can be used with all major browsers. The OnlinePay dashboard is also supported on mobile devices.
Forgot password or password link expired
If you have forgotten your password, or if the link you have been sent to create a password has expired, choose the Forgot password? link from the sign in page.
This will send you an email with a link to reset your password. Click the link in the email to reset your password.
Reset your password
You will be prompted to reset your password if you have forgotten it or if your password is about to expire.
Please note your password will expire every 90 days. You will start receiving email notifications 14 days before your password expires with instructions on how to reset it. Further emails will be sent 7, 3, and 1 day before your password expires if you have not reset it.
You can reset your password in the dashboard under your user profile settings.
-
Log in to the dashboard.
-
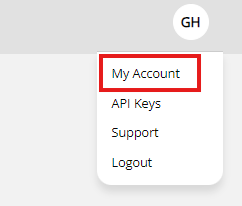
Click on your user profile icon in the top right corner, then select My Account.
-
On your user profile page, click Edit user at the bottom of the page.
-
Scroll to the bottom of the page and click Change password.
-
Provide your current password, then enter and confirm your new password.
-
Click Update to update your password.
Payment methods
Your OnlinePay test environment allows you to simulate transactions using all payment methods available in the production environment without performing any legitimate transactions.
| Integration method | Description | PCI compliance |
|---|---|---|
| Hosted Payments Page (HPP) | Full page redirect to OnlinePay servers | SAQ A |
| iFrame | Render a OnlinePay hosted form on your website | SAQ A |
| Pay by Link | Send payment links to your customers manually or automate with an API | SAQ A |
| Server-to-Server API | Perform API calls to capture customer payment information and place orders | SAQ D |
Testing the OnlinePay API
You can use your test environment credentials to test server-to-server REST API calls for capture customer details, payment information, and place orders. REST API uses RESTful architecture, or Representational State Transfer, which allows you to exchange information reliably and securely through application programming interface (API) requests.
This section covers the information you need to know to interact with our APIs and start taking online payments.
Depending on your familiarity with using APIs, you may want to use an API client, such as Postman or Insomnia , so that you can easily capture and store variables. Alternatively, you can make cURL requests directly from the command line or use our API Reference documentation
Authentication
OnlinePay's API uses the Basic authentication method to secure REST API requests. Basic authentication sends HTTPS requests with an Authorization header containing Base64-encoded strings as a username and password.
These encoded keys are passed in the API request header in the following format:
Authorization: Basic {"{user-uid}"}:{"{api-key}"}
Replace the {"{user-uid}"} and {"{api-key}"} values with your own keys.
Environment variables
| Variable | |
|---|---|
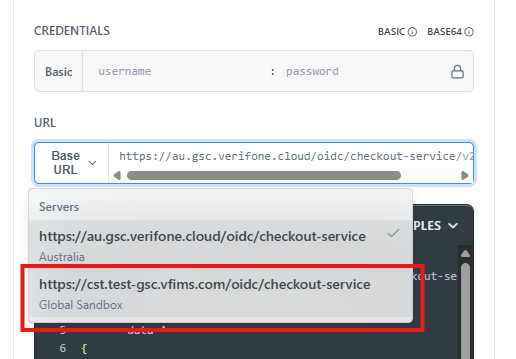
| Base URL for Test Environment | https://cst.test-gsc.vfims.com |
| API Key | Create an API Key |
| User ID | Retrieve your User ID |
| Payment Provider Contracts | Payment Provider Contracts |
| 3DS Contract | 3DS Contract |
| Entity ID | Entity ID |
The API Reference section allows you to test API requests directly from the documentation.
To run API requests using your test account credentials, select the correct Base URL from the drop-down in the Try It column on the right.
Create an API key
To create an API key, your OnlinePay account must have at least one of the following roles:
-
Merchant Admin
-
Merchant External Partner
-
Merchant Supervisor
-
Merchant Cashier
Use the following procedure to create a new API key or copy one you've already created.
-
Log in to your OnlinePay dashboard.
-
Click your settings menu in the upper-right corner, then select API Keys.
-
Click Create API key.
-
Click Copy public key to copy the key to your clipboard.
-
Paste the API key into your preferred REST API client, such as Postman or Insomnia, or save it in a secure location for use when making requests using cURL.
NoteWhen you close the API key window or click Discard, you will not be able to retrieve the key again.
You can have up to five API keys.
Do not share your API key or make it available to anyone else.
Retrieve your User ID
Do the following steps to retrieve your unique user-uid.
-
Navigate to My Account in the OnlinePay dashboard.
-
Copy the string in the URL following
/users/.
-
Save the UUID value as a
userIdvariable in your REST API client.Alternatively, you can pass the UUID in your request header if using cURL.
Payment Provider Contracts
-
In your OnlinePay dashboard, navigate to Administration > Account Setup > Payment (Provider) Contracts.
-
Click the payment provider contract that you want to use for your API request.
-
Copy the Payment Provider Contract ID and save it to your preferred REST API client as an environment variable or save it in a secure location for use when making requests using cURL.
3DS Contract
-
In your OnlinePay dashboard, navigate to Administration > Advanced Settings > 3DS Contracts.
-
Click the 3D Secure provider contract you want to use for your API request.
-
On the 3DS contract details page, copy the 3-D Secure Contract ID and save it to your preferred REST API client as an environment variable or save it in a secure location for use when making requests using cURL.
Entity ID
-
In your OnlinePay dashboard, navigate to Administration > Account Setup > Organisation.
-
Click the name of the organisation or site that you want to use for your API request.
-
On the organisation General information page, copy the Organisation ID and save it to your preferred REST API client as an environment variable or save it in a secure location for use when making requests using cURL.
Testing the OnlinePay test environment
The OnlinePay test environment is designed to simulate real-world transactions without processing actual payments. Certain behaviours and responses have been predefined to help you test various scenarios.
Triggering specific error responses
By default, all transactions initiated in the test environment simulator are approved with a response code of 0000. However, in production, you may encounter failed transactions due to various reasons.
To simulate error scenarios ("unhappy flows") in the test environment, you can trigger specific error responses by submitting a transaction with an amount that ends in certain values. The simulator will return a corresponding error code. Refer to the table below for the mapping of amount endings to error codes.
| Amount last 3 digits | Transaction Status (readTransaction API) | Response | Reason Code (readTransaction API) |
|---|---|---|---|
| 121 | FAILED | TECHNICAL | 121 |
| 122 | FAILED | UNKNOWN | 122 |
| 123 | FAILED | FAILED | 123 |
| 131 | FAILED | MISSING | 131 |
| 132 | AUTHORISED | PARTIAL | 132 |
Test cards for payments
You can use the following test card numbers to simulate different payment scenarios in your test environment. These cards will not process real transactions but will help you test various payment flows.
Cards that are not 3D Secure will not trigger the 3D Secure flow, so you can test transactions without additional authentication steps.
| Card Type | Card Number | Expiry Date | CVV | 3D Secure |
|---|---|---|---|---|
| Visa | 4564 7100 0000 0004 | 02/29 | 847 | No |
| Visa | 4601 8420 9009 4756 | 08/26 | 490 | Yes |
| Mastercard | 5163 2000 0000 0008 | 08/30 | 070 | No |
Card Verification Value (CVV) check simulator
The OnlinePay test environment simulates the Card Verification Value (CVV) check. The following CVV values will trigger different responses:
| card.cvv | cvv_result | Meaning |
|---|---|---|
| 111 | 1 | Matched |
| 222 | 2 | Not matched |
| 333 | 3 | Not checked |
| any other value | 0 | Unavailable |
Test settlements
A simulator settlement is triggered by a payment of $76.51 (7651). This updates transaction statuses as follows:
- All authorised transactions from the current and previous days will appear as
Settled. - Declined transactions will display the
Settlement Failedstatus.
No details are displayed on the Settlements page.
Test refunds
A refund can only be performed once a transaction reaches the Settled status. After successfully completing a sale transaction for $76.51, the option to issue a refund becomes available in the dashboard in the transaction details under Orders/Transactions, or you can use the API to issue a refund via the POST /transactions/{transactionId}/refund endpoint.